WARNING: This post is based in my personal opinion, I’m not trying to sell anything, and I’m not related to neither of the projects in any way.
It’s been a long time since I published something and it’s because I have been busy changing the blog to another server and testing several things like OSSEC that I will tell you about in future post.
Today I bring you a post that combines two softwares that I have liked for a long time but that I didn’t have a lot of chances to really use them without being simple tests. Those are I2P and Retroshare.
Neither of them is as well-known as Tor or other alternatives that we have seen even in the TV, sadly this means that the amount of help in the internet is quite limited. The purpose of this post is, precisely, try to help them be more known.
But, What are the advantages of messing with this?
At functional level? None. At the contrary, we are gonna have services that we already use daily but they are probably gonna me slower and have more downtime.
What we really win is privacy. I2P provides the first layer of anonymity helping us hide our IP and Retroshare gives us several decentralized services.
What makes Retroshare so interesting is its decentralized model where there are no servers to connect to obtain the different services, in this case, this services work in a secure way between different nodes connected between them.
To be able to connect two nodes a key exchange must be done, like in GPG, with this both users allow the nodes to connect to each other. Doesn’t matter if you add somebody, if the other person doesn’t add you the connection will not happen.
The major problem with this method is that our public IP is included in that key as Retroshare needs it to know where is our node and how to reach it. This was the major reason why I stopped using Retroshare, even being based in a trust model I wasn’t convinced with the idea of my IP being disclosed like that.
In version 0.6 Retroshare includes the possibility to run hidden nodes with integration for TOR and I2P, thanks to this instead of using our IP we can use onion or i2p addresses.
I should explain that if we run a node this way the normal nodes will be only able to reach our node if they have configured an exit towards this networks. I couldn’t test this too much due to the lack of nodes inside and outside of this networks but, with a small network of two nodes, my normal client wasn’t able to ready the hidden one and vice versa.
Then idea is to have several services (messenger, chat, file exchange, etc) that doesn’t depend on central servers (our information goes directly from one node to the other) and that they don’t need our public IP (use of I2P addresses).
Fortunately there is a quite some information about how to install both this softwares so I’m gonna skip that step, I only have to say that if you use Debian 8 I recommend you install Retroshare using the packet they have in github or, if you want co compile it, check a ticket I open about the dependencies as the ones in the wiki are outdated. If you try to install it using the repositories you will see and error about a missing dependency, this has already been reported too and they are working on it.
Once we have I2P running and our Profile created in Retroshare let’s get started.
We will start configuring the tunnels we are gonna need in I2P so Retroshare has everything it needs when we configure our hidden node.
For this we will go to the router section “Local tunnels”, if you have I2P in local it should be: http://127.0.0.1:7657/i2ptunnelmgr
As the steps, even somehow hidden, are quite well explained in Retroshare:
Tunnel Wizard -> Client Tunnel -> SOCKS 4/4a/5 -> enter a name -> leave ‘Outproxies’ empty -> enter port (memorize!) [you may also want to set the reachability to 127.0.0.1] -> check ‘Auto Start’ -> finish!
You can change the port if you want but by default both I2P and Retroshare use port 4447.
This is the tunnel that we will use to access the I2P network and the other nodes, now we will go with the input tunnel.
In the same section:
Tunnel Wizard -> Server Tunnel -> Standard -> enter a name -> enter the address and port your RS is using (see Local Address above) -> check ‘Auto Start’ -> finish!
Same as in the previous case, the port by default in both software is the same, 44321, if you don’t want to change it just leave it like that.
Once the tunnel is running, in “Local tunnels”, we could see that a base32 address appears and that will be the address we use for our hidden node.
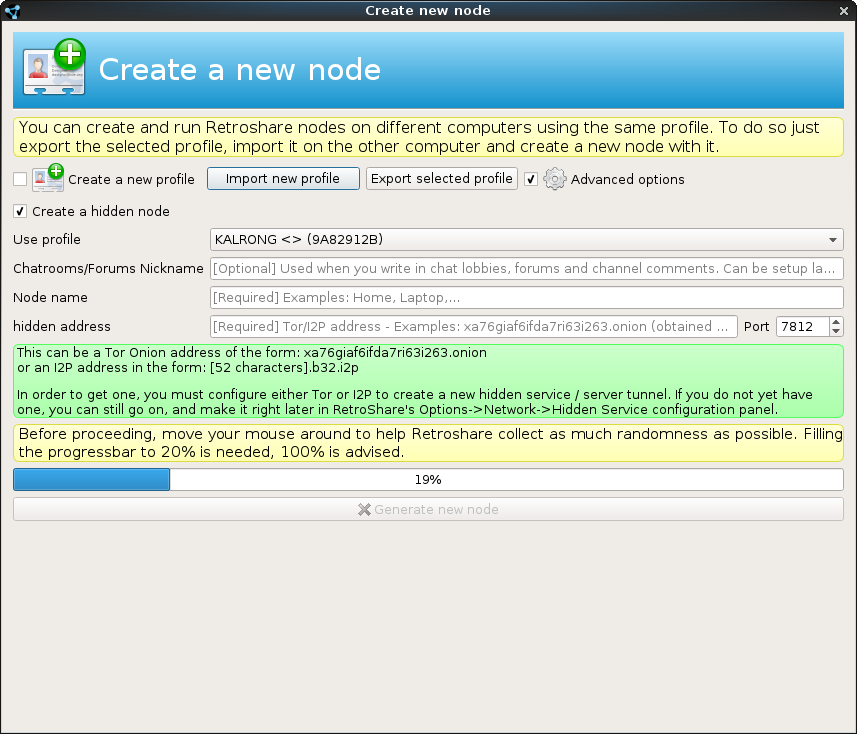
Now we move to Retroshare and in the first window where we choose with which profile we want to connect we click in “Manage profiles and nodes” and the we will see the following window:

Check “Advance options” and “Create hidden node” when it appears.
As you can see it ask us to identify the node with a name and the hidden address that will be the same I2P address we saved before while creating the input tunnel.
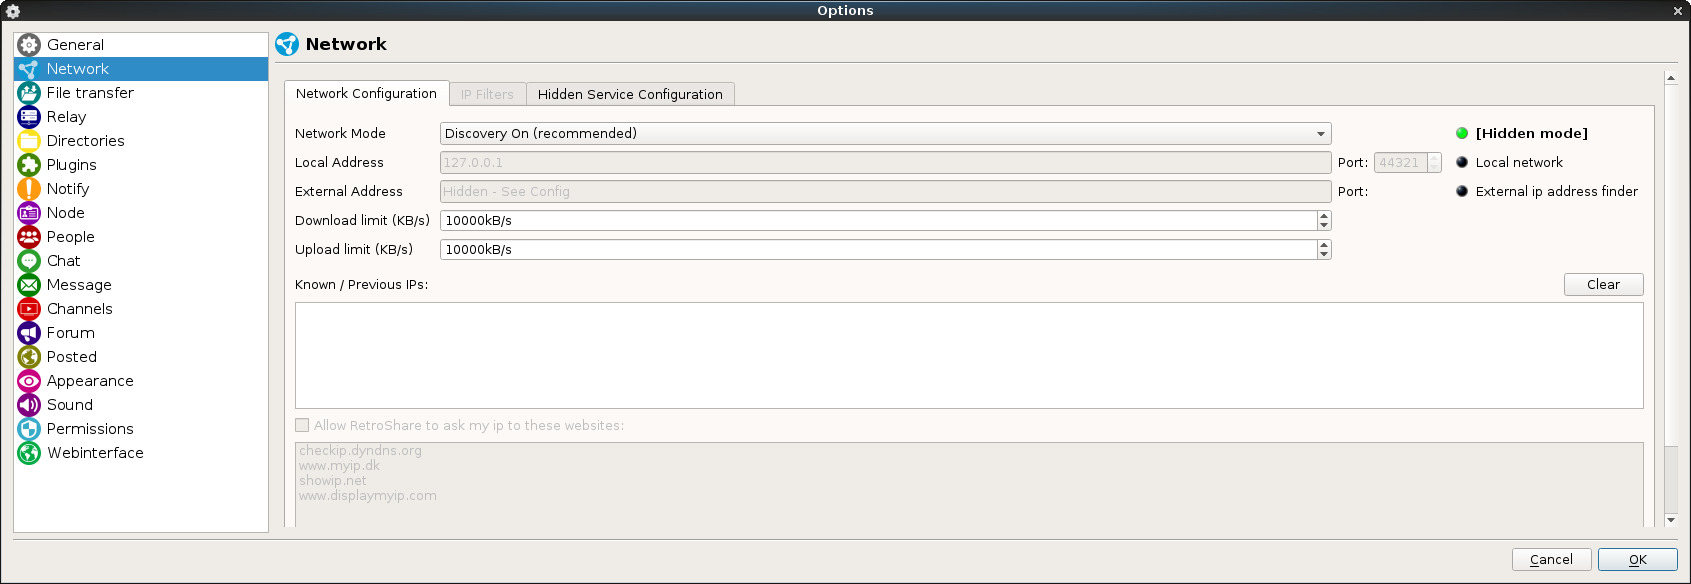
Once inside our new node go to the section “Networking” inside “Options”:

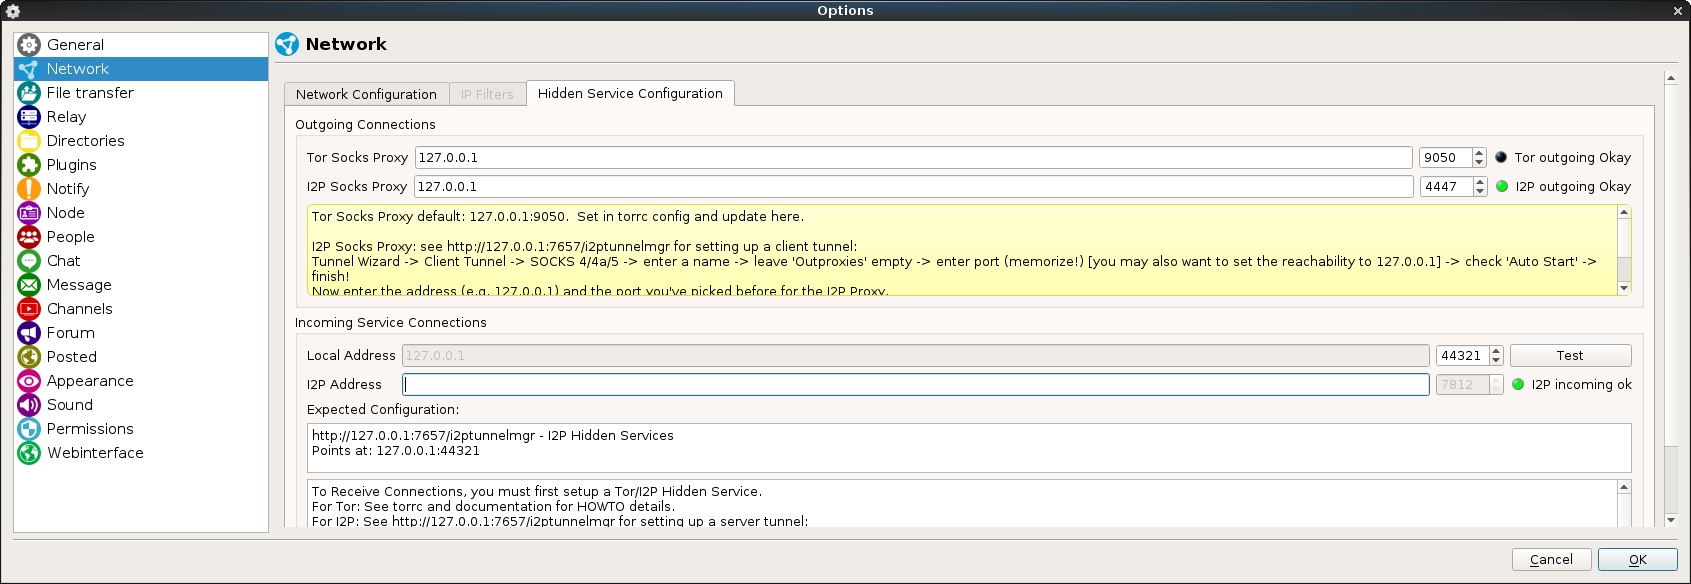
Here we can see that the node is running in hidden mode, in the tab “Hidden Service Configuration” we have more data:

In the first section we could see that, in my node’s case, Retroshare has outbound connection towards the I2P network but not to the TOR network; afaik there shouldn’t be any problem having any type of node connected to both networks at the same time, this will simply give you access to nodes in each of the networks. In this case we want a node that works only over I2P so it should be enough to have I2P in green.
In the next section we find the inbound configuration, as I’m still doing test I have deleted my I2P address for this node, if we click in “Test” Retroshare will try to reach our node over I2P as if it was any other one to check that everything is ok, if you see a green light like in the image, everything is perfect.
Now we just need to exchange keys with our friends now using our I2P address instead of our public IP and start enjoying Retroshare.
As you can see in the images Retroshare itself explains the steps to follow to configure everything, I have told you anything that you couldn’t find yourselves, but I thought that this information is somehow hidden and that somebody who didn’t know where to look (as it happened to me) it can give you some headaches.
Hope you enjoy it and that people gains interest in both I2P and Retroshare, both project look very interesting but probably because they could be a little bit complex to use it looks like they are not very welcome by the users. Hope this will change and people begin to use this kind of alternatives.
I would like to leave here the key for my test node that I have in I”P so you could test it but as we are speaking about privacy I don’t really like the idea of just leaving it here so, if somebody is interested just leave a comment and we can share keys.
Greeting and thanks for your visit.


besides the fact that i really dislike your title of the blog, i thank you for posting this.
Sorry about that, the original title was in spanish and this is just a translación but thanks for your visit and comment
Thanks for the tutorial, but I still am having trouble connecting. I think I am using the wrong ports..
What’s exactly your problem? I may be able to help
Many thanks! I will try to follow your instructions.
I will use RS mainly as an Instant Messenger and I am wondering if my trusted friend on the other side will need to follow the same procedure in his machine. In the case that it is not needed, do you still recommend to do it to increase safety and privacy?
Do you think that I2P is better than TOR in terms of privacy and anonymity? I have done extensive researches, but I still don’t know who is the winner.
If you create a hidden node in I2P your friend will still need to have the RS configured to reach the I2P network, same with TOR nodes.
As the I2P network grows it becomes more resilient and private, there are a lot of discussions about which one is best but as the original purpose is really different (TOR: anonymous clearnet VS I2P: independent darknet over the internet).
I was wondering if you know how to point retroshare (i2p) to a different client that runs the server tunnel? (Not the machine that runs retroshare
Thats an issue I have posted on the retroshare github about, currently a remote i2p installation is not configurable, you can try using bob but the best way to make it work is to map the ports to the remote machine, in my case I use putty to map the ports in my linux server where the i2p tunnels are listening to my windows computer where retroshare is running.
Hi. Thanks for the post. Want to test it, please send me your retroshare key.
Besides, do you know some puplic places where I can find “anonymous” friends to use retroshare over I2P? I mean not directly asking keys like I just did.