HackerOne 212 CTF Writeup

Long time everybody, I know I haven’t post in quite a lot of time but maintaining the blog in two languages takes more time that I expected I have more than a half a dozen posts half translated waiting for me to have some free time 🙁 but today I give you a little writeup about the CTF that HackerOne organized this past few days, I hope you enjoy it.

Challenge:
An engineer of acme.org launched a new server for a new admin panel at
http://104.236.20.43/. He is completely confident that the server can’t be hacked. He added a
tripwire that notifies him when the flag file is read. He also noticed that the default Apache
page is still there, but according to him that’s intentional and doesn’t hurt anyone. Your goal?
Read the flag!

Writeup:
On the url provided we can see that also mentioned default page for Apache (Ubuntu version)
after some digging the only other page that have something interesting was the uri /flag with
the following result:


The fact that they gave us the domain of the company and the reference to the admin panel
made me try to put the domain in my hosts file pointing to that ip resulting in a cookie being
set:


Lets try to set the cookie to yes:

GET is not allowed, so my next option is to try a POST:

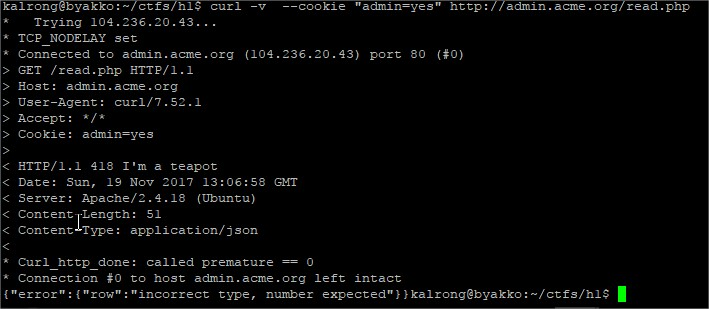
Something seems to be missing.In the mean time dirbuster found the uris /read.php and /reset.php, while reset just replied with and ok message read seemed to be more successful:

After several tries sending the parameter row as json (due to the reply’s type), url and even a
cookie I decided to go back to index and try posting there:

Ok, it expects a domain, lets add it:

Needs to be a .com:

Strange, I tried adding another .com:

So it seems that the domain should follow the format 212.domain.com:

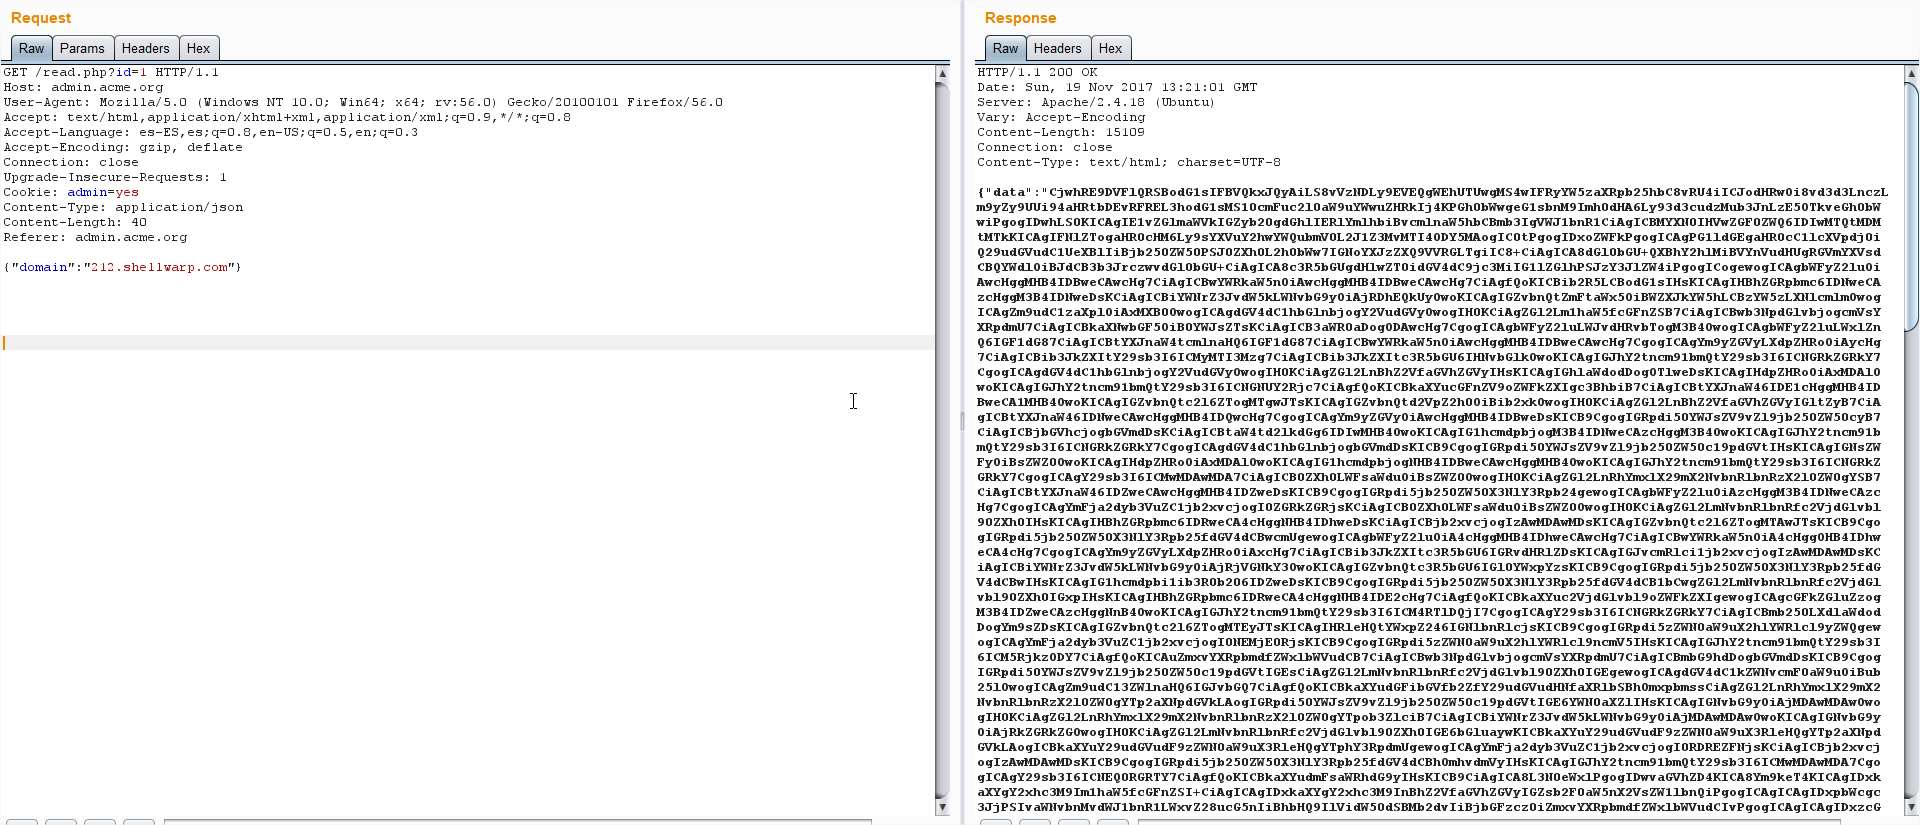
So lets go back to read.php and see whats in there:

Decoding the base64 shows the content of the website, so it seems we are facing an SSRF
vulnerability so lets point our domain to 127.0.0.1 and repeat the call:

This time we get the default page of Apache again, but now we can try to find other services
appending the port, after a while I found something interesting in the port 1337:

And this time we get the message “Hmm, where would it be?” The flag page I found before
seemed the obvious place but the problem was that the calls ended up looking like /flag.com
so I needed to scape the .com but the usual characters where not allowed.So, lets try to move that .com to another header:

But the reply was empty, wait, wasn’t the ID growing one by one? I just jumped from ID 10 to
12, lets see what’s in the ID 11:

Bingo! I decoded the base64 and found:

This has been a really interesting challenge, thanks a lot to the HackerOne guys for it!!!

Hope I can update this part of the blog more often, thanks for your visit!

Posted in ctf, hackerone, web, writeups | Leave a comment

Iptables for Docker in an internet exposed server

Today I have a little guide for you for those of you who want to install Docker in a server which interface is exposed to the internet. Due to the iptables rules Docker creates by default when we use the -p option to forward a port without specifying the interface we will find out that this port is also being exposed to the internet, something we don’t want in most of the cases.

The solution is to tell Docker to not touch our iptables. In systems like Debian that use systemd we can achieve this by using the following commands:

mkdir /etc/systemd/system/docker.service.d
cat << EOF > /etc/systemd/system/docker.service.d/noiptables.conf
[Service]
ExecStart=
ExecStart=/usr/bin/docker daemon -H fd:// --iptables=false
EOF
systemctl daemon-reload

Source

We restore our iptables using iptables-restore for example, also restart Docker and we will see that it doesn’t generate the Docker table or any other rule. But, as always there is a but, this has left our containers without internet access.

The first step to fix this is to enable forwarding in our system if we don’t have it already:


sysctl -w net.ipv4.ip_forward=1

And then we add the following lines:

iptables -A FORWARD -i docker0 -o eth0 -j ACCEPT
iptables -A FORWARD -i eth0 -o docker0 -j ACCEPT

This will allow the traffic to reach the containers but the problem will be that it will not know what to do with the response, for this we need to add a MASQUERADE rule, if you use the default Docker range the rule will look like this:

iptables -t nat -A POSTROUTING -s 172.17.0.0/24 -o eth0 -j MASQUERADE

You should do this for each segment in your Docker network that you want it to have internet access.

With this you can open and close port in your server the usual way without Docker opening them by itself.

Wazuh

I found this issue while checking my Wazuh installation, the problem was that after applying the above changes my clients weren’t able to connect to Wazuh anymore.

The problem comes from Wazuh that is seeing the server instead of the client ip due to the MASQUERADE rule and as it didn’t match any the client’s ip it rejected the packets.

The only option I could find so far was to remove the clients and register them again using any as the ip in a way that Wazuh will accept any origin ip for the clients.

Remenber that for the containers to have internet, if you have used docker-compose, you will need to add a MASQUERADE rule for that specific network, in my case 172.17.0.0/24.

Hope you have enjoyed the post and saves you from unwanted surprises like mine finding out my containers exposed to the internet even after spending hours crafting my iptables so that didn’t happen, but we can always learn.

Best regards, and as always, thanks for  your visit!

Posted in docker, tutorial, wazuh | 1 Comment

Script to install Docker in Debian

Here is a little script that will install docker for you from their official repositories without many headaches.

WARNING: This script was designed with new installations in mind, if you already have docker installed from the Debian repositories, uninstall it first to avoid conflicts.

To use the script just copy the following code to a .sh file and execute it as root:

#Docker installation script for Debian by KALRONG

apt-get update
apt-get -y upgrade
apt-get -y dist-upgrade
apt-get -y install screen apt-transport-https ca-certificates gnupg2
apt-key adv --keyserver hkp://ha.pool.sks-keyservers.net:80 --recv-keys 58118E89F3A912897C070ADBF76221572C52609D
echo "deb https://apt.dockerproject.org/repo debian-jessie main" > /etc/apt/sources.list.d/docker.list
apt-get update
apt-get -y install docker-engine

As  you can see is not very complex hehe hope it helps you.


Best regards and thanks for your visit!

Posted in docker | Leave a comment

SECCON 2016 – Vigenere Crypto (100)

Following the SECCON writeups here is a crypto challenge.

We get the following challenge.


Vigenere

k: ????????????
p: SECCON{???????????????????????????????????}
c: LMIG}RPEDOEEWKJIQIWKJWMNDTSR}TFVUFWYOCBAJBQ

k=key, p=plain, c=cipher, md5(p)=f528a6ab914c1ecf856a1d93103948fe

 |ABCDEFGHIJKLMNOPQRSTUVWXYZ{}
-+----------------------------
A|ABCDEFGHIJKLMNOPQRSTUVWXYZ{}
B|BCDEFGHIJKLMNOPQRSTUVWXYZ{}A
C|CDEFGHIJKLMNOPQRSTUVWXYZ{}AB
D|DEFGHIJKLMNOPQRSTUVWXYZ{}ABC
E|EFGHIJKLMNOPQRSTUVWXYZ{}ABCD
F|FGHIJKLMNOPQRSTUVWXYZ{}ABCDE
G|GHIJKLMNOPQRSTUVWXYZ{}ABCDEF
H|HIJKLMNOPQRSTUVWXYZ{}ABCDEFG
I|IJKLMNOPQRSTUVWXYZ{}ABCDEFGH
J|JKLMNOPQRSTUVWXYZ{}ABCDEFGHI
K|KLMNOPQRSTUVWXYZ{}ABCDEFGHIJ
L|LMNOPQRSTUVWXYZ{}ABCDEFGHIJK
M|MNOPQRSTUVWXYZ{}ABCDEFGHIJKL
N|NOPQRSTUVWXYZ{}ABCDEFGHIJKLM
O|OPQRSTUVWXYZ{}ABCDEFGHIJKLMN
P|PQRSTUVWXYZ{}ABCDEFGHIJKLMNO
Q|QRSTUVWXYZ{}ABCDEFGHIJKLMNOP
R|RSTUVWXYZ{}ABCDEFGHIJKLMNOPQ
S|STUVWXYZ{}ABCDEFGHIJKLMNOPQR
T|TUVWXYZ{}ABCDEFGHIJKLMNOPQRS
U|UVWXYZ{}ABCDEFGHIJKLMNOPQRST
V|VWXYZ{}ABCDEFGHIJKLMNOPQRSTU
W|WXYZ{}ABCDEFGHIJKLMNOPQRSTUV
X|XYZ{}ABCDEFGHIJKLMNOPQRSTUVW
Y|YZ{}ABCDEFGHIJKLMNOPQRSTUVWX
Z|Z{}ABCDEFGHIJKLMNOPQRSTUVWXY
{|{}ABCDEFGHIJKLMNOPQRSTUVWXYZ
}|}ABCDEFGHIJKLMNOPQRSTUVWXYZ{

Vigenere cipher
https://en.wikipedia.org/wiki/Vigen%C3%A8re_cipher

Again they are giving us an enormous clue with the title and even a link to the wikipedia. It wasn’t being too difficult.

If the above wasn’t enough they provided us with the charset and the md5 of the reply with which the great master Patatas built the following scripts to resolve the challenge, first a known text attack is performed using the text we know from the flag:


<?php
function vigenere_decrypt_customcharset($txt, $clave, $charset) {
 $lentxt = strlen($charset);
 $lenkey = strlen($clave);

 $txt2 = '';
 for($i=0; $i<strlen($txt); $i++) {
 $c = strpos($charset, $txt[$i]); // caracter texto
 $x = strpos($charset, $clave[$i%$lenkey]); // caracter clave
 if($x!==FALSE and $c!==FALSE) {
 $txt2 .= $charset[($c - $x + $lentxt) % $lentxt]; // aplicar vigenere
 } else {
 $txt2 .= '?'; // aplicar vigenere
 //echo "X";
 }
 }
 return $txt2;
}

$charset = 'ABCDEFGHIJKLMNOPQRSTUVWXYZ{}';

$p = 'SECCON{???????????????????????????????????}';
$c = 'LMIG}RPEDOEEWKJIQIWKJWMNDTSR}TFVUFWYOCBAJBQ';

// PRIMERA PARTE

$key1 = vigenere_decrypt_customcharset($c, $p, $charset);
echo "KEY1: $key1\n\n";
?>

This gives us the following result:

php vigenere_part1.php 
 SECCON{???????????????????????????????????}
KEY1: VIGENER???????????????????????????????????R

As we only know the first 7 characters we can see that the first part of the key is “VIGENERE”. With this, knowing the key length and the md5 we can perform a brute force attack against the rest of the key:

<?php
/* ---------------------------------------------------
 	VIGENERE
--------------------------------------------------- */
function vigenere_decrypt_customcharset($txt, $clave, $charset) {
 $lentxt = strlen($charset);
 $lenkey = strlen($clave);

 $txt2 = '';
 for($i=0; $i<strlen($txt); $i++) {
 $c = strpos($charset, $txt[$i]); // caracter texto
 $x = strpos($charset, $clave[$i%$lenkey]); // caracter clave
 if($x!==FALSE and $c!==FALSE) {
 $txt2 .= $charset[($c - $x + $lentxt) % $lentxt]; // aplicar vigenere
 } else {
 $txt2 .= '?'; // aplicar vigenere
 //echo "X";
 }
 }
 return $txt2;
}
$charset = 'ABCDEFGHIJKLMNOPQRSTUVWXYZ{}';

$p = 'SECCON{???????????????????????????????????}';
$c = 'LMIG}RPEDOEEWKJIQIWKJWMNDTSR}TFVUFWYOCBAJBQ';

$keyx = 'VIGENERE';

for($i=0; $i<strlen($charset); $i++) {
for($j=0; $j<strlen($charset); $j++) {
for($k=0; $k<strlen($charset); $k++) {
for($l=0; $l<strlen($charset); $l++) {

	$key = $keyx . $charset[$i]. $charset[$j] . $charset[$k] . $charset[$l];
	$p2 = vigenere_decrypt_customcharset($c, $key, $charset);
	echo "PLAIN: $p2\n\n";
	$md5 = md5($p2);
	if($md5=='f528a6ab914c1ecf856a1d93103948fe') {
		echo "FOUND!! $key $p2\n";
		exit;
	}
}}}}

?>

Execute the script and in less than 2 seconds we get the key:

php vigenere_part2.php
CLAVE: VIGENEREAAAA
PLAIN: SECCON{ADOEEBCDEDEFGJWMNKLMNOPQRUFWYVWXYYZ}

CLAVE: VIGENEREAAAB
PLAIN: SECCON{ADOEDBCDEDEFGJWMMKLMNOPQRUFWXVWXYYZ}

CLAVE: VIGENEREAAAC
PLAIN: SECCON{ADOECBCDEDEFGJWMLKLMNOPQRUFWWVWXYYZ}

CLAVE: VIGENEREAAAD
PLAIN: SECCON{ADOEBBCDEDEFGJWMKKLMNOPQRUFWVVWXYYZ}
.....
CLAVE: VIGENERECODC
PLAIN: SECCON{ABABCBCDEDEFGHIJLKLMNOPQRSTTWVWXYYZ}

CLAVE: VIGENERECODD
PLAIN: SECCON{ABABBBCDEDEFGHIJKKLMNOPQRSTTVVWXYYZ}

CLAVE: VIGENERECODE
PLAIN: SECCON{ABABABCDEDEFGHIJJKLMNOPQRSTTUVWXYYZ}

FOUND!! VIGENERECODE SECCON{ABABABCDEDEFGHIJJKLMNOPQRSTTUVWXYYZ}

And there is the key “VIGENERECODE” and the flag:

SECCON{ABABABCDEDEFGHIJJKLMNOPQRSTTUVWXYYZ}

Again the clues help us a lot in the investigation part and we could limit ourselves to resolve the challenge.

Hope you enjoyed it, greetings!!!


Posted in ctf, forensic, seccon, writeups | Leave a comment

SECCON 2016 – Memory Analysis Forensic (100)

As I told you before we didn’t have too much time to participate in this CTF so this will be the last writeup I can give you of the challenges we solved.

We get the following challenge:

Memory Analysis
Find the website that the fake svchost is accessing.
You can get the flag if you access the website!!

memoryanalysis.zip
The challenge files are huge, please download it first.

Hint1: http://www.volatilityfoundation.org/
Hint2: Check the hosts file

password: fjliejflsjiejlsiejee33cnc

Again the give us the investigation part almost complete, we know that this is a memory dump and, as per the svchost process, that is a windows.

There is also a clue about using volatility, a really useful tool for this kind of challenges, I recommend you to check it out if you don’t know it already.

I this case I took a different route and tried a method that already worked for me in other forensic challenges, and that was using strings.

To make the searches faster I dumped the strings results to a file:


strings forensic_100.raw > forensic_100.strings

But, this way I can’t file the hosts file, right? With volatility I should have been able to search the process and extract the file, but knowing the default content of the hosts file I searched for the ip 127.0.0.1 and made grep show me the following line to avoid false positives; in the case that I needed more results I could always ask for more:

grep -A 1 127.0.0.1 forensic_100.strings

This give us the following result:

127.0.0.1
tIcfChangeNotificationDestroy
--
127.0.0.1
0,0,0,0,0,0
--
F127.0.0.1
 + 0x%X
--
127.0.0.1
Unrecoverable memory allocation failure
--
v127.0.0.1
255.240.0.0
--
127.0.0.1
tIcfChangeNotificationDestroy
--
127.0.0.1
255.240.0.0
--
127.0.0.1
0,0,0,0,0,0
--
127.0.0.1       localhost
153.127.200.178    crattack.tistory.com attack.tistory.com 
--
127.0.0.1
Unrecoverable memory allocation failure
--
127.0.0.1
tIcfChangeNotificationDestroy
--
127.0.0.1
255.240.0.0
--
127.0.0.1
0,0,0,0,0,0
--
127.0.0.1       localhost
153.127.200.178    crattack.tistory.com 
--
127.0.0.1:1028
crattack-747355:0
--
127.0.0.1:1033
svchost.exe:1320
--
127.0.0.1:1900
svchost.exe:1036
--
127.0.0.1:123
H49	t

There we can see two very promising results pointing at crattack.tistory.con and the ip 153.127.200.178, we try doing another search using the domain:

grep crattack.tistory.com forensic_100.strings

And we get this:

Host: crattack.tistory.com
Referer: http://crattack.tistory.com/entry/Data-Science-import-pandas-as-pd
Host: crattack.tistory.com
Access-Control-Allow-Origin: http://crattack.tistory.com
Host: crattack.tistory.com
http://crattack.tistory.com/trackback/90W
153.127.200.178    crattack.tistory.com attack.tistory.com 
Visited: SYSTEM@http://crattack.tistory.com/entry/Data-Science-import-pandas-as-pd
http://crattack.tistory.com/favicon.ico
Visited: SYSTEM@http://crattack.tistory.com/rss
Visited: SYSTEM@http://crattack.tistory.com/entry/Data-Science-import-pandas-as-pd
http://crattack.tistory.com/favicon.ico
Visited: SYSTEM@http://crattack.tistory.com/entry/Data-Science-import-pandas-as-pd
http://crattack.tistory.com/favicon.ico
Visited: SYSTEM@http://crattack.tistory.com/entry/Data-Science-import-pandas-as-pd
http://crattack.tistory.com/favicon.ico
Visited: SYSTEM@http://crattack.tistory.com/entry/Data-Science-import-pandas-as-pd
http://crattack.tistory.com/favicon.ico
\http://crattack.tistory.com/plugin/CallBack_bootstrapperSrc?nil_profile=tistory&nil_type=copied_post
g;http://crattack.tistory.com/favicon.ico
http://crattack.tistory.com/entry/Data-Science-import-pandas-as-pd
C:\Program Files\Internet Explorer\iexplore.exe http://crattack.tistory.com/entry/Data-Science-import-pandas-as-pd
153.127.200.178    crattack.tistory.com 
http://crattack.tistory.com/entry/Data-Science-import-pandas-as-pd
"C:\Program Files\Internet Explorer\iexplore.exe" http://crattack.tistory.com/entry/Data-Science-import-pandas-as-pd
http://crattack.tistory.com/entry/Data-Science-import-pandas-as-pd
Visited: SYSTEM@http://crattack.tistory.com/entry/Data-Science-import-pandas-as-pd
http://crattack.tistory.com/favicon.ico
Visited: SYSTEM@http://crattack.tistory.com/entry/Data-Science-import-pandas-as-pd
http://crattack.tistory.com/favicon.ico
Visited: SYSTEM@http://crattack.tistory.com/entry/Data-Science-import-pandas-as-pd
http:crattack.tistory.com
http://crattack.tistory.com/entry/Data-Science-import-pandas-as-pd
crattack.tistory.com
>Visited: SYSTEM@http://crattack.tistory.com/entry/Data-Science-import-pandas-as-pd
http://crattack.tistory.com/entry/Data-Science-import-pandas-as-pd
>Visited: SYSTEM@http://crattack.tistory.com/entry/Data-Science-import-pandas-as-pd
http://crattack.tistory.com/entry/Data-Science-import-pandas-as-pd
Visited: SYSTEM@http://crattack.tistory.com/entry/Data-Science-import-pandas-as-pd
http://crattack.tistory.com/favicon.ico
http:crattack.tistory.com
Visited: SYSTEM@http://crattack.tistory.com/entry/Data-Science-import-pandas-as-pd
http://crattack.tistory.com/favicon.ico
>Visited: SYSTEM@http://crattack.tistory.com/entry/Data-Science-import-pandas-as-pd
Visited: SYSTEM@http://crattack.tistory.com/entry/Data-Science-import-pandas-as-pd
http://crattack.tistory.com/favicon.ico
>Visited: SYSTEM@http://crattack.tistory.com/entry/Data-Science-import-pandas-as-pd
http://crattack.tistory.com/entry/Data-Science-import-pandas-as-pd
:2016120620161207: SYSTEM@http://crattack.tistory.com/entry/Data-Science-import-pandas-as-pd
:2016120620161207: SYSTEM@:Host: crattack.tistory.com
:2016120620161207: SYSTEM@http://crattack.tistory.com/entry/Data-Science-import-pandas-as-pd
>Visited: SYSTEM@http://crattack.tistory.com/entry/Data-Science-import-pandas-as-pd
Visited: SYSTEM@http://crattack.tistory.com/entry/Data-Science-import-pandas-as-pd
http://crattack.tistory.com/favicon.ico
Visited: SYSTEM@http://crattack.tistory.com/entry/Data-Science-import-pandas-as-pd
http://crattack.tistory.com/favicon.ico
://crattack.tistory.com/favicon.ico
tp://crattack.tistory.com/favicon.ico
>Visited: SYSTEM@http://crattack.tistory.com/entry/Data-Science-import-pandas-as-pd
http://crattack.tistory.com/favicon.ico
Visited: SYSTEM@http://crattack.tistory.com/entry/Data-Science-import-pandas-as-pd
http://crattack.tistory.com/favicon.ico
http://crattack.tistory.com/entry/Data-Science-import-pandas-as-pd
>Visited: SYSTEM@http://crattack.tistory.com/entry/Data-Science-import-pandas-as-pd
Visited: SYSTEM@http://crattack.tistory.com/entry/Data-Science-import-pandas-as-pd
http://crattack.tistory.com/favicon.ico
w:2016120620161207: SYSTEM@http://crattack.tistory.com/entry/Data-Science-import-pandas-as-pd
Visited: SYSTEM@http://crattack.tistory.com/entry/Data-Science-import-pandas-as-pd
http://crattack.tistory.com/favicon.ico
Visited: SYSTEM@http://crattack.tistory.com/entry/Data-Science-import-pandas-as-pd
://crattack.tistory.com/favicon.ico
w:2016120620161207: SYSTEM@http://crattack.tistory.com/entry/Data-Science-import-pandas-as-pd
Visited: SYSTEM@http://crattack.tistory.com/entry/Data-Science-import-pandas-as-pd
http://crattack.tistory.com/favicon.ico
>Visited: SYSTEM@http://crattack.tistory.com/entry/Data-Science-import-pandas-as-pd
http://crattack.tistory.com/favicon.ico
http:crattack.tistory.com
Visited: SYSTEM@http://crattack.tistory.com/entry/Data-Science-import-pandas-as-pd
http://crattack.tistory.com/favicon.ico
http://crattack.tistory.com/entry/Data-Science-import-pandas-as-pd
Visited: SYSTEM@http://crattack.tistory.com/entry/Data-Science-import-pandas-as-pd
http://crattack.tistory.com/favicon.ico
>Visited: SYSTEM@http://crattack.tistory.com/entry/Data-Science-import-pandas-as-pd
tp://crattack.tistory.com/favicon.ico
Visited: SYSTEM@http://crattack.tistory.com/entry/Data-Science-import-pandas-as-pd
http://crattack.tistory.com/favicon.ico
>Visited: SYSTEM@http://crattack.tistory.com/entry/Data-Science-import-pandas-as-pd
Visited: SYSTEM@http://crattack.tistory.com/entry/Data-Science-import-pandas-as-pd
http://crattack.tistory.com/favicon.ico
crattack.tistory.com
>Visited: SYSTEM@http://crattack.tistory.com/entry/Data-Science-import-pandas-as-pd
crattack.tistory.com:http
crattack.tistory.com

Looks like we found the URL that we needed, knowing that instead of using the DNS record we need to use the ip we found earlier we visit the following website:

http://153.127.200.178/entry/Data-Science-import-pandas-as-pd

It will download a file that once we open it will show the flag:

SECCON{_h3110_w3_h4ve_fun_w4rg4m3_}

Maybe I will try to solve this challenge again using volatility but as you can see, with only two basic command we were able to solve it without major issues.

This is probably gonna be the last writeup of the SECCON this year, as the platform is still open, and if I have time, I will try to finish some of the other challenges that I left half completed and will show you how I did it.

As always, thanks for your visit!


Posted in ctf, forensic, seccon, writeups | Leave a comment

SECCON 2016 – VoIP Forensic (100)

This year we have some time problems in the Shellwarp team to participate in the SECCON’s CTF (http://2016.seccon.jp/), only Patatas (team member) and me had some time to check and solve a few of them.

But as we can learn from everything, even the smallest things, here are some writeups from the event.

In this case we get the following statement:


VoIP
Extract a voice.
The flag format is SECCON{[A-Z0-9]}.
voip.pcap

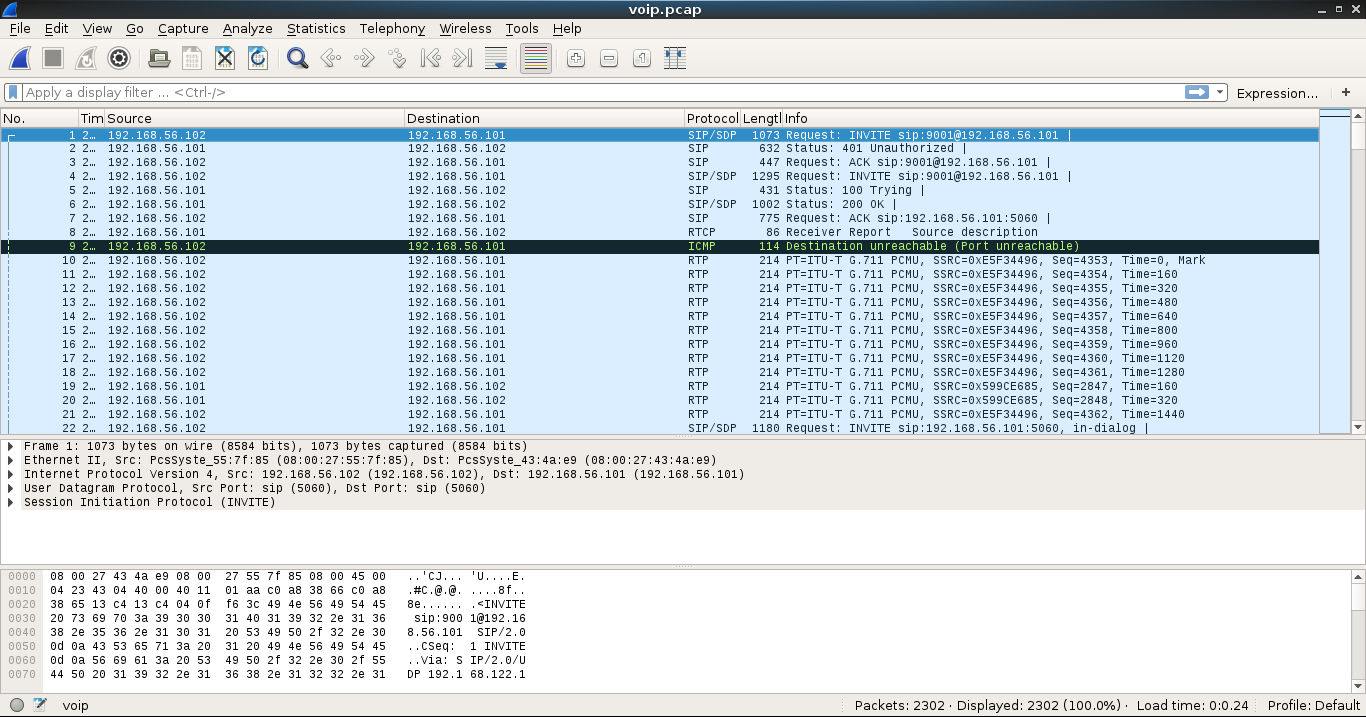
Short and straight to the point. They give us a pcap and the title itself is a huge clue about where we should look. Wireshark has an option to extract VoIP content so, if we are lucky, we may be able to use it to solve the challenge, lets go:

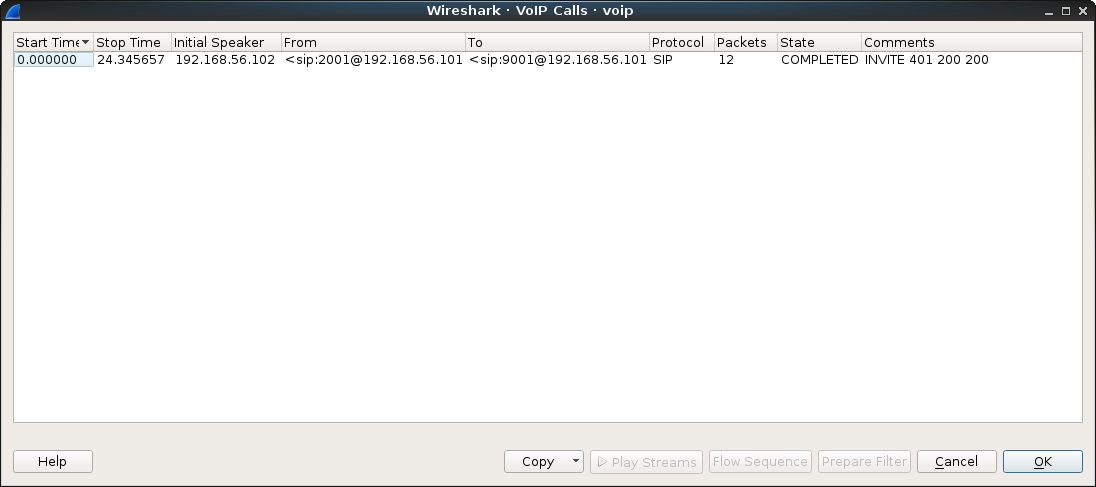
In the top menu click on “Telephony” -> “VoIP Calls” and we get the following window:

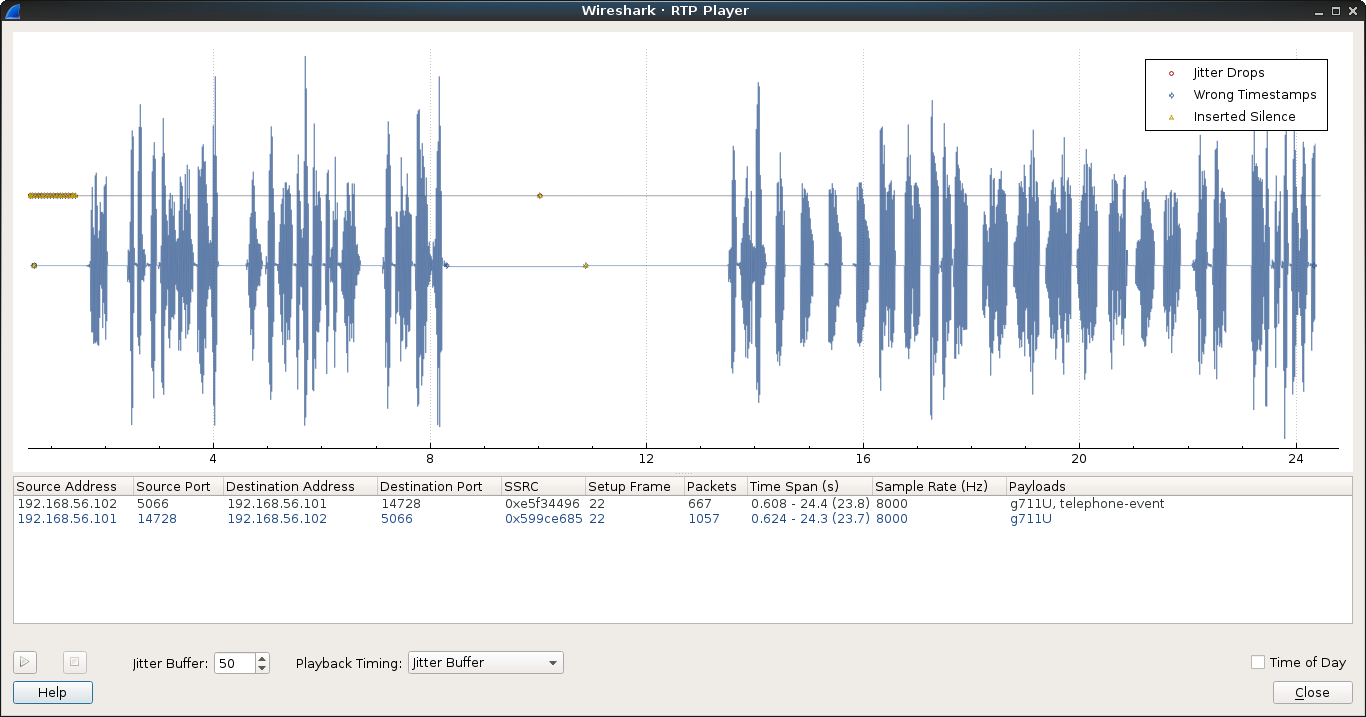
Looks like we got lucky, we select the call and click on “Play streams”:

If we click on play we can hear what looks like the SECCON’s voice mail, and at the end it will spell the flag for us, remembering us of the flag format:

SECCON{9001IVR}

I may say that this was one of the easiest ones and most of the teams got it, but it was a nice practice hehe

Regards and thanks for the visit!


Posted in ctf, forensic, seccon, writeups | Leave a comment

Basic hardening guide for Debian

Back from the Cybercamp 2016, about which I will talk you about in future post, I have decided to finish this little guide about basic hardening that I apply to my Debian installations.

Probably you won’t need to apply everything I recommend or maybe some options doesn’t adjust to what you need. This is not a dogma to follow blindly, I recommend that you stop to check what each option does and instead of just doing copy/paste, adapt it to what you need.

In the title I specify Debian but any distro based on it should be compatible with this guide.

You are gonna need root permissions to do this changes so you will need to be logged as root or at least an user with sudo.

Before we start I recommend you to update your system to be sure you have the latest security patches.


apt-get update; apt-get upgrade; apt-get dist-upgrade

Let’s start with a classic: iptables.

To begin with we are gonna start installing the packet iptables-persistent:

apt-get install iptables-persistent

This packet will make our iptables rules load on boot and give us an easy way to keep them updated.

In the installation process you may have been asked to save your current rules, depending of what you did you may already have the file /etc/iptables/rules.v4, if you don’t, create it manually.

We are gonna edit the above mentioned file /etc/iptables/rules.v4 so it looks like this:

*nat
:PREROUTING ACCEPT [48:11060]
:INPUT ACCEPT [2:104]
:OUTPUT ACCEPT [5:270]
COMMIT
*filter
:INPUT DROP [27:7448]
:FORWARD ACCEPT [0:0]
:OUTPUT ACCEPT [325:462098]
-A INPUT -m conntrack --ctstate RELATED,ESTABLISHED -j ACCEPT
-A INPUT -i lo -j ACCEPT
COMMIT

What this rules do is cut any remote connection attempt to the machine except those that already exist, this way, if you are connected over SSH you will not be kicked out of the machine.

If you want to open a port at boot time simply add a line like this one before the last COMMIT:

-A INPUT -p tcp -m tcp --dport 22 -j ACCEPT

Or if you want to just open it till the next reboot:

iptables -A INPUT -p tcp -m tcp --dport 22 -j ACCEPT

And to close it:

iptables -D INPUT -p tcp -m tcp --dport 22 -j ACCEPT

To save your current rules you can run this command:

iptables-save > /etc/iptables/rules.v4

And to restore them:

iptables-restore < /etc/iptables/rules.v4

Iptables is a world on itself so, I will recommend you take a look at it in depth and add the rules you may need.

The next thing we are gonna do is to apply a little bit of hardening to the kernel, to do this we are gonna edit the file /etc/sysctl.conf and add the following lines at the end:

net.ipv4.icmp_echo_ignore_all=1
net.ipv4.icmp_echo_ignore_broadcasts=1
net.ipv6.conf.all.disable_ipv6=1
net.ipv6.conf.default.disable_ipv6=1
net.ipv6.conf.lo.disable_ipv6=1
net.ipv6.conf.eth0.disable_ipv6=1
kernel.core_uses_pid=1
kernel.ctrl-alt-del=0
kernel.kptr_restrict=2
kernel.sysrq=0
net.ipv4.conf.all.accept_redirects=0
net.ipv4.conf.all.log_martians=1
net.ipv4.conf.all.rp_filter=1
net.ipv4.conf.all.send_redirects=0
net.ipv4.conf.default.accept_redirects=0
net.ipv4.conf.default.accept_source_route=0
net.ipv4.conf.default.log_martians=1
net.ipv4.tcp_timestamps=0
net.ipv6.conf.all.accept_redirects=0
net.ipv6.conf.all.accept_source_route=0
net.ipv6.conf.default.accept_redirects=0
net.ipv4.conf.all.forwarding=0

As you can see the lines are not properly sorted, this is my preference, if you look closely the first block of net rules disable ping and ipv6, the other block are more specific rules; in any case, the order doesn’t really matter.

As in the iptables case I recommend you to check and see what you need and you dont; for example, probably some of you may want to forward traffic between interfaces so you should remove the last rule.

Once we have the file edited we will launch the next command to apply the changes, or you can always reboot, is your uptime not mine:


sysctl -p

The next step will be to change the SSH configuration a little bit to make it more robust. To do that we should edit the file /etc/ssh/sshd_config and modify/add the following options so they look like this:

UsePrivilegeSeparation SANDBOX
LogLevel VERBOSE
PermitRootLogin no
X11Forwarding no
TCPKeepAlive no
AllowTcpForwarding no
ClientAliveCountMax 2
Compression no
MaxAuthTries 3
MaxSessions 2

You may have notice that I didn’t change the port, this is recommended, as if you leave SSH listening a simple nmap will reveal the service, but I will leave it to your decision.

Restar the SSH service to apply the changes:


/etc/init.d/ssh restart

Last but not least we will apply a password security policy.

Install the PAM module pam_passwdqc:


apt-get install libpam-passwdqc

And modify the file /etc/login.defs so it looks like this:

PASS_MAX_DAYS   90
PASS_MIN_DAYS   1
PASS_WARN_AGE   7

I should say again that this is a simple recommendation, adjust the values as you need.

Another personal recommendation would be to disable all those services that you don’t need, specially those that list in some ports. Even with iptables already blocking them it never hurst. For example, for the CUPS service:

/etc/init.d/cups stop; systemctl disable cups

What the previous command does is, first stop the service and later on disable the autostart on boot time. This doesn’t prevent that other applications may start the service, this only tells the system that, if nobody asks for it, don’t start it.

If you want to have a general idea of the hardening status of your machine I recommend you try the application Lynis. It’s already on the Debian repos but I like to use their own to have the latest version, to do this run the following commands:


echo "deb https://packages.cisofy.com/community/lynis/deb/ jessie main" > /etc/apt/sources.list.d/cisofy-lynis.list
apt-get install apt-transport-https
apt-get update; apt-get install lynis

Now we simply run Lynis like this:

lynis audit system

What Lynis is gonna do is run several check in our machine and at the end will provide a series of recommendations and a grade, in my case I like that my machine’s grade are at least at 85.

And that’s it, you may have noticed that I only touched SSH as an application, that’s because as this is a basic guide I thought it was already long enough without getting into apps that some people doesn’t even have. If you want any specific guide for an app just let me know.

Hope you enjoyed this post, and as always; thanks for your visit, and don’t be shy, leave a comment!


Posted in hardening, tools, tutorial | 3 Comments

I2P Problems with ports

While I write the post about OSSEC and after seeing that some people have problems with the ports in I2P I decided to create this little post trying to explain what are the usual problems, an anecdote and their solutions.

Note: Even if I2P appears as behind a firewall it should work but the quality of the service will be severely reduced.

From now on I will refer to your I2P router as 127.0.0.1 as its the default IP used, if you have the router in another machine remember to change this.

UPNP

By default I2P tries to use UPNP for the port redirection in the router, this is not always possible as, the ISP may not allow us to enable UPNP or even trying is not an option, public networks.

If you can access your router, check if UPNP is enabled and try again, as every router is a different world I can’t explain how to do it.

You can check the status of UPNP in I2P in this link:


http://127.0.0.1:7657/peers#upnp

Manual redirection

In case that UPNP is not an option, because your doesn’t allow it or your paranoid level is high enough that you don’t want applications opening ports in your router (like me), you have the option to redirect the necessary ports manually in your router.

To disable UPNP (as we are not going to use it) and configure the ports for I2P we should go to:

http://127.0.0.1:7657/confignet

As you can see the first option allow us to disable UPNP and if we continue to scroll down we will find the sections for the UDP and TCP ports.

By default I2P uses the port UDP 29622 and TCP is configured to use the same one. Following your paranoia level you may want to change this as you wish.

Once we finish changing things, save them and let’s go to our router. Again I’m sorry to say that I can’t explain how to redirect ports but this option is usually available under “Port Fordwarding” or something similar.

Is very important that  you remember that you need both UDP and TCP port to be able to enjoy the full I2P experience.

Testing ports

If you have already done all the previous steps you can use on of the several website in the internet that check if you have a specific port open, bu, as we are in a high level of paranoia it will be always better to do it ourselves using nmap for example.

VPN


In case that you have your own VPN (sadly public vpns usually don’t allow us to play around with ports) you could try “jumping” over the local firewall (I will explain this in the future) and pass over your vpn.

Note that in this cases is better to have your I2P router already running on the same server as the VPN if possible and simply point your device to the router address in the vpn.

The people from Hackerñol did a video about this last point:

Video in Spanish:

Multiple routers

In I2P’s subrredit (/r/i2p) a little while ago I was helping a user that even after trying a thousand things we couldn’t make the behind a firewall message disappear.

Well, in the end this guy had his own router and the ISP router, but instead of having it in modem mode or with a DMZ, they were just one after the other.

The problem was that using UPNP or manual redirections they only happened in his router but the ISP one was still blocking the ports.

In this case (not sure which method he decided to use) he had two options, configure his router as a DMZ in the ISP’s router making all the traffic reach directly his own router; or manually redirect the ports in both routers: from the ISP router to his own and from his own router to his PC.

This is all I can think at the moment and they usually are pretty common, in case you have doubts, know about other issues, etc, etc just let me know and will be happy to help you and update the post.

Greetings!

Posted in i2p | Leave a comment

Retroshare over I2P

WARNING: This post is based in my personal opinion, I’m not trying to sell anything, and I’m not related to neither of the projects in any way.

It’s been a long time since I published something and it’s because I have been busy changing the blog to another server and testing several things like OSSEC that I will tell you about in future post.

Today I bring you a post that combines two softwares that I have liked for a long time but that I didn’t have a lot of chances to really use them without being simple tests. Those are I2P and Retroshare.

Neither of them is as well-known as Tor or other alternatives that we have seen even in the TV, sadly this means that the amount of help in the internet is quite limited. The purpose of this post is, precisely, try to help them be more known.

But, What are the advantages of messing with this?

At functional level? None. At the contrary, we are gonna have services that we already use daily but they are probably gonna me slower and have more downtime.

What we really win is privacy. I2P provides the first layer of anonymity helping us hide our IP and Retroshare gives us several decentralized services.

What makes Retroshare so interesting is its decentralized model where there are no servers to connect to obtain the different services, in this case, this services work in a secure way between different nodes connected between them.

To be able to connect two nodes a key exchange must be done, like in GPG, with this both users allow the nodes to connect to each other. Doesn’t matter if you add somebody, if the other person doesn’t add you the connection will not happen.

The major problem with this method is that our public IP is included in that key as Retroshare needs it to know where is our node and how to reach it. This was the major reason why I stopped using Retroshare, even being based in a trust model I wasn’t convinced with the idea of my IP being disclosed like that.

In version 0.6 Retroshare includes the possibility to run hidden nodes with integration for TOR and I2P, thanks to this instead of using our IP we can use onion or i2p addresses.

I should explain that if we run a node this way the normal nodes will be only able to reach our node if they have configured an exit towards this networks. I couldn’t test this too much due to the lack of nodes inside and outside of this networks but, with a small network of two nodes, my normal client wasn’t able to ready the hidden one and vice versa.

Then idea is to have several services (messenger, chat, file exchange, etc) that doesn’t depend on central servers (our information goes directly from one node to the other) and that they don’t need our public IP (use of I2P addresses).

Fortunately there is a quite some information about how to install both this softwares so I’m gonna skip that step, I only have to say that if  you use Debian 8 I recommend you install Retroshare using the packet they have in github or, if you want co compile it, check a ticket I open about the dependencies as the ones in the wiki are outdated. If you try to install it using the repositories you will see and error about a missing dependency, this has already been reported too and they are working on it.

Once we have I2P running and our Profile created in Retroshare let’s get started.

We will start configuring the tunnels we are gonna need in I2P so Retroshare has everything it needs when we configure our hidden node.

For this we will go to the router section “Local tunnels”, if you have I2P in local it should be: http://127.0.0.1:7657/i2ptunnelmgr

As the steps, even somehow hidden, are quite well explained in Retroshare:

Tunnel Wizard -> Client Tunnel -> SOCKS 4/4a/5 -> enter a name -> leave ‘Outproxies’ empty -> enter port (memorize!) [you may also want to set the reachability to 127.0.0.1] -> check ‘Auto Start’ -> finish!

You can change the port if you want but by default both I2P and Retroshare use port 4447.

This is the tunnel that we will use to access the I2P network and the other nodes, now we will go with the input tunnel.

In the same section:

Tunnel Wizard -> Server Tunnel -> Standard -> enter a name -> enter the address and port your RS is using (see Local Address above) -> check ‘Auto Start’ -> finish!

Same as in the previous case, the port by default in both software is the same, 44321, if you don’t want to change it just leave it like that.

Once the tunnel is running, in “Local tunnels”, we could see that a base32 address appears and that will be the address we use for our hidden node.

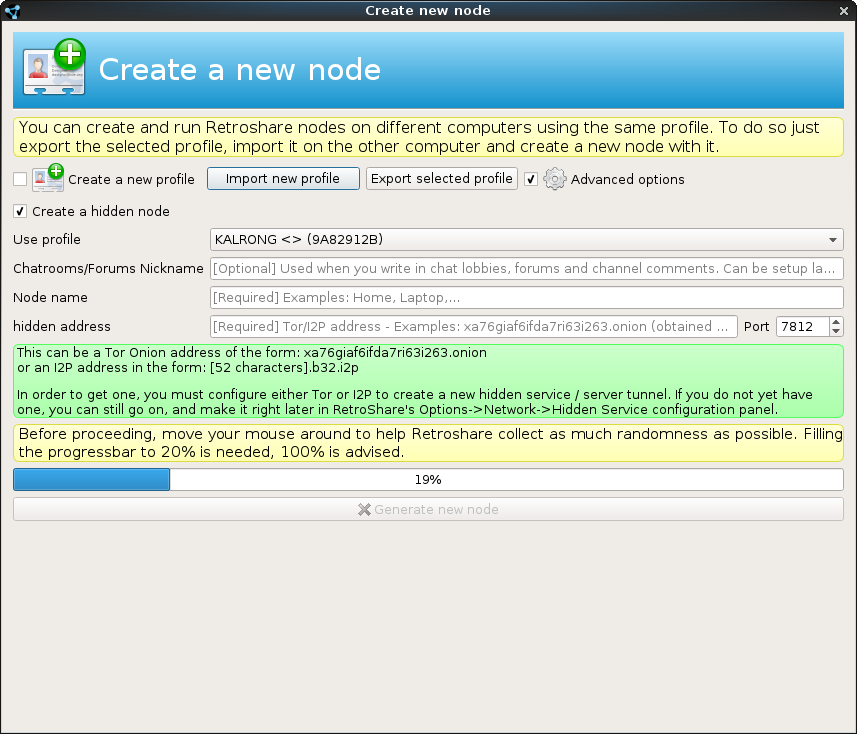
Now we move to Retroshare and in the first window where we choose with which profile we want to connect we click in “Manage profiles and nodes” and the we will see the following window:

new-node

Check “Advance options” and “Create hidden node” when it appears.

As you can see it ask us to identify the node with a name and the hidden address that will be the same I2P address we saved before while creating the input tunnel.

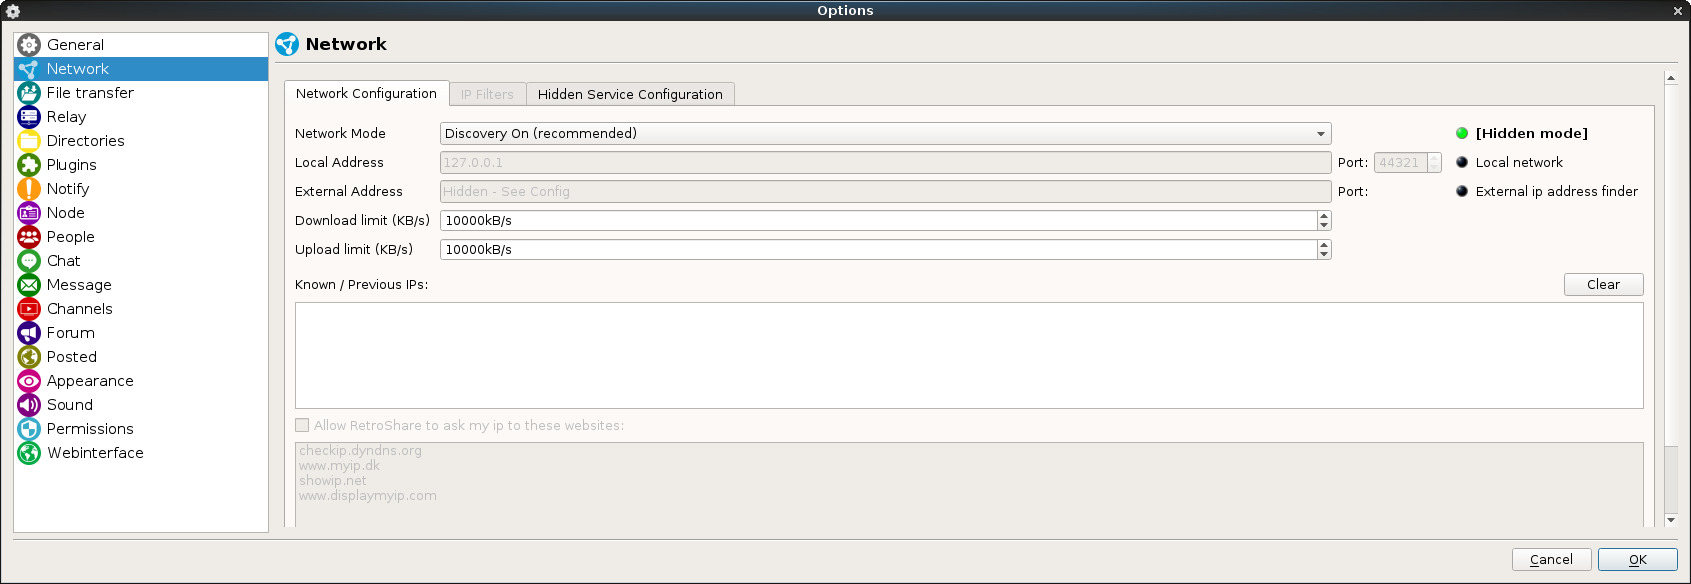
Once inside our new node go to the section “Networking” inside “Options”:

options-network


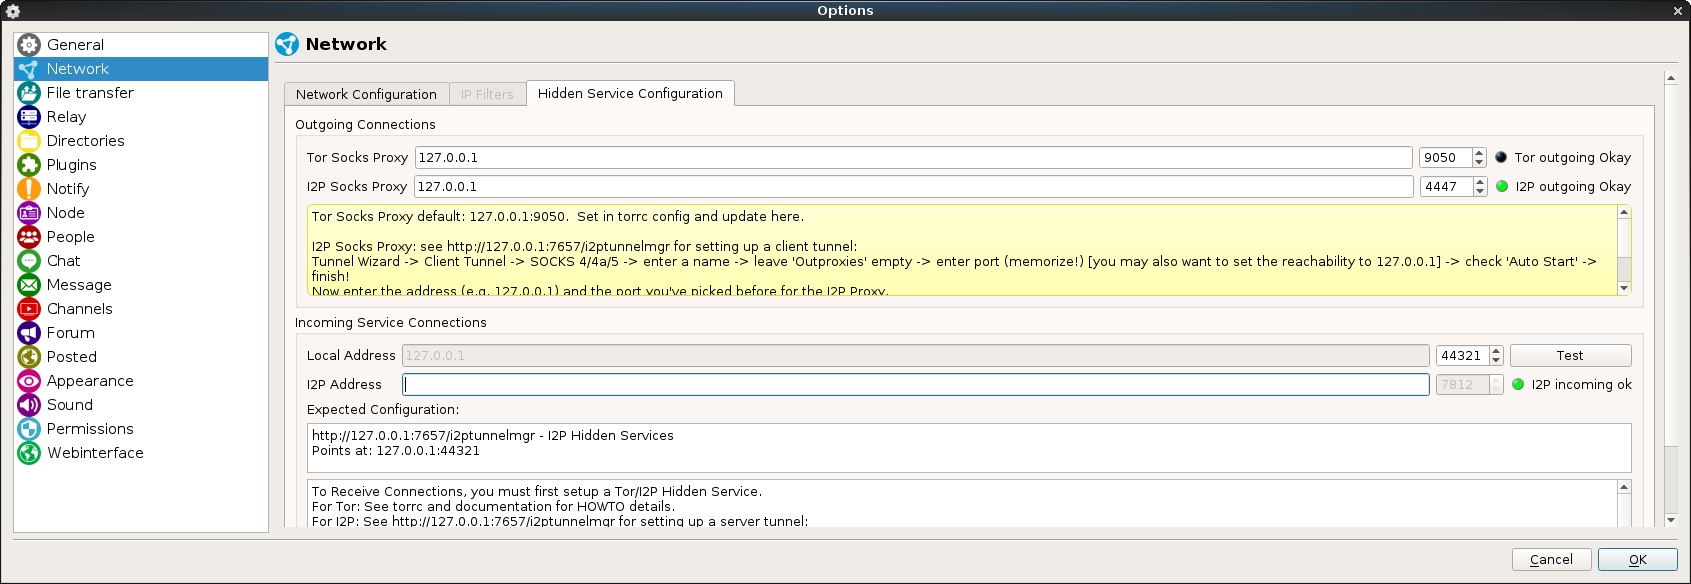
Here we can see that the node is running in hidden mode, in the tab “Hidden Service Configuration” we have more data:

hidden-service


In the first section we could see that, in my node’s case, Retroshare has outbound connection towards the I2P network but not to the TOR network; afaik there shouldn’t be any problem having any type of node connected to both networks at the same time, this will simply give you access to nodes in each of the networks. In this case we want a node that works only over I2P so it should be enough to have I2P in green.

In the next section we find the inbound configuration, as I’m still doing test I have deleted my I2P address for this node, if we click in “Test” Retroshare will try to reach our node over I2P as if it was any other one to check that everything is ok, if you see a green light like in the image, everything is perfect.

Now we just need to exchange keys with our friends now using our I2P address instead of our public IP and start enjoying Retroshare.

As you can see in the images Retroshare itself explains the steps to follow to configure everything, I have told you anything that you couldn’t find yourselves, but I thought that this information is somehow hidden and that somebody who didn’t know where to look (as it happened to me) it can give you some headaches.

Hope you enjoy it and that people gains interest in both I2P and Retroshare, both project look very interesting but probably because they could be a little bit complex to use it looks like they are not very welcome by the users. Hope this will change and people begin to use this kind of alternatives.

I would like to leave here the key for my test node that I have in I”P so you could test it but as we are speaking about privacy I don’t really like the idea of just leaving it here so, if somebody is interested just leave a comment and we can share keys.

Greeting and thanks for your visit.


Posted in i2p, retroshare | 9 Comments

Trivial over the network with Docker and Python

Ïn MundoHackerDay one of the miscellaneous challenges that we proposed was a little trivial where the players should obtain a certain number of correct answers to get the flag.

This idea surged from the trivial on the Pragyan CTF where you may reply to 50 random questions related to India. In that case each player got a set of 50 questions that didn’t change so you could just do trial and error, I decided to be a little bit bad and in this case the questions set is random each time.

Before somebody starts calling me names let me say that we where a little bit “lazy” as we only wrote 15 questions and you just needed to answer 10 so, I wasn’t that bad hehe

You can obtain the image directly from https://hub.docker.com/r/kalrong/trivial/ just doing:

docker pull kalrong/trivial

In case you may prefer to test it locally or check the sources you can go to the github repository where I have it stored and from where the build is automatically triggered in hub.docker: https://github.com/KALRONG/trivial

In case you try it with Docker remember to map the container’s port in case you want somebody else to connect.

This is the help of the trivial:

usage: trivial.py [-h] [-p PORT] [-q QUESTIONS] [-l LOG] [-f FLAG]
                  [-a ANSWERS]

optional arguments:
  -h, --help            show this help message and exit
  -p PORT, --port PORT  Specify which port to be used. Default: 8100
  -q QUESTIONS, --questions QUESTIONS
                        File containing the questions for the trivial.
                        Default: /root/questions
  -l LOG, --log LOG     Folder where the logs will be saved. Defauld: ./log/
  -f FLAG, --flag FLAG  Flag given at the end of the game to the winners.
                        Default: flag{Tr1v14L-RuL3z}
  -a ANSWERS, --answers ANSWERS
                        Number of correct answers before the flag is given.
                        Default: 1

Bot, the docker image and the repository, contain a file with an example questions so you can test it. In case that you run it directly on your machine note that by default the questions file is in /root , this is because I didn’t want to mess around in docker.As you can see in the help the trivial is quite configurable, you can change the port, the log path, questions path, the flag, etcI didn’t have time yet to add the option on how verbose the server is, right now it will give you real-time information in the shell and also create a log file for each ip. The idea is to be able to control what people is doing and see if there are problems with certain questions or, in the worst case, ban somebody.

Hope you enjoy this little tool and don’t forget to leave your suggestions, questions or problems you may find, they will be welcome.

See you around!

Posted in docker, python, tools | Leave a comment