How to install Kali Nethunter on Nexus and OnePlusOne

After getting back from Mundo Hacker Day 2016 is now the turn to continue with the blog, thanks to the guys from StackOverFlow who lent me a OnePlusOne (aka OPO) I had the chance to play a little with the Kali Nethunter, a mod for Android/CM from the guys of Offensive Security that transforms your device in a portable tool for pentesting.

Device Android Version Notes
Nexus 4 (mako) 5.1.1
CM 13.0
Nexus 5 (hammerhead) 5.1.1 or 6.0.1
CM 13.0
Nexus 5x (bullhead) 6.0.1
Nexus 6 (shamu) 5.1.1 or 6.0.1
Nexus 6P (angler) 6.0.1
Nexus 7 2012 (grouper) 5.1.1
Nexus 7 2013 (flo) 5.1.1 or 6.0.1
CM 13.0
Nexus 9 (flounder) 5.1.1 or 6.0.1
Nexus 10 (manta) 5.1.1
OnePlus One (oneplus1) CM 12.1 or 13.0 Recommended
OnePlus Two (oneplus2) CM 12.1 or 13.0
OnePlus X (oneplusx) CM 13.0
LG G5 (h830, h850) 6.0.1
Galaxy Note 3 (hlte) CM 12.1 or 13.0
TouchWiz 5.0
Galaxy S5 (klte) CM 12.1 or 13.0
TouchWiz 5.1 or 6.0
SHIELD tablet (shieldtablet)
SHIELD tablet K1
6.0.1
CM 13.0

In this table you can check the different devices and OS versions that Nethunter supports, as one of the thing that Nethunter modifies is the kernel it makes it quite difficult to port to other devices, in my case I’m checking to port it to my BQ M5.5 but I’m not really sure what the outcome will be.

Obtaining Nethunter

The first step will be to obtain Nethunter for our device, here we have two options, we can download the latest build from here or build it on our computer.

For this post I will explain the steps using the latest build that comes ready for Nexus and OPO. I’m gonna leave the build part for when I advance more in the BQ port.

Getting the device ready

Once we have got the Nethunter the next will get the device ready for the installation.

We should unlock our device and make sure that we have a compatible version installed as per the table in the beginning of this post.

To unlock our phone we will use the following command (I assume you have access to the device using ADB):

#Reboot in fastboot mode
adb reboot bootloader
#Check that the device is indeed in fastboot mode
fastboot devices
#Unlock the device
fastboot oem unlock
#Reboot
fastboot reboot

If everything was OK we should have our device ready to continue.

Optional: Install TWRP and SuperSu to make the manual installation.

Installing Nethunter

Here we have two installation methods, manual and automatic. After several tries I finally chose the automatic one.

In case that you want to do the manual installation you should install the optional software specified mentioned above and just install the ZIP from TWRP.

Even if there is a Windows installation method I will not speak about it as I didn’t have the chance to test and don’t want to give you false tips.

The Linux installation is quite simple, first we clone the NetHunter Linux Root Toolkit with git.

git clone https://github.com/offensive-security/nethunter-LRT

Here we have all the scripts needed for the installation but not the binaries required:

  1. If you want to also use this scripts to go back to Stock or a compatible version you will need to download the images in ZIP and put them in the folder stockImage/.
  2. We download TWRP from their web and we put it in the folder twrpImage/.
  3. Download SuperSu from XDA post and put it in the folder superSu/.

In case you want to use this scripts to go back to Stock or a compatible version there are two, one for Nexus and another one for OPO, both will delete everything in your device.

  • stockNexusFlash.sh : For Nexus devices.
  • stockOpoFlash.sh : For OPO devices, note that this script needs an argument, 16gb or 64gb, depending in your model.

Once ready to install we simply execute the following script, and if everything is ok, the script will indicate which steps are being run and we will also see it working on the device.

./twrpFlash.sh

If everything is OK after the device restarts you will see the Nethunter bootsplash image and you will be ready to use it.

Hope you enjoyed this post and it helps you, in future post I will try to show you different tools that come with Nethunter. For any problem or correct feel free to leave a comment and I will gladly help.

Best regards!

References: https://github.com/offensive-security/kali-nethunter/wiki

Posted in nethunter | 19 Comments

Docker, a “little” introduction

Lately I have being playing a lot with Docker, whatsoever, this blog is running on it, but What is Docker?

Docker is a software that allow us to run containers (think of them as VM’s for the moment) in a simple, light and fast way.

In the previous line I told you to think of a container as a VM, that’s not exactly true. A VM contains a full OS with everything that it required to boot as if it was a physical machine, this usually means that the disk usage is quite high from the beginning (Yeah, I know, you can make a super light installation not even bigger that a Gb). In Docker the containers only contain the required files (binaries, libraries, etc, etc) to work as the kernel is shared with the Host.

Docker also removes the hypervisor what makes it even lighter, and something I love, it can run inside a VM (only in Linux, Windows has a limitation that I will explain later on).

And, What does all this mean? To show you a real example, this is the disk usage of this blog currently on my Docker:

# docker ps -s
CONTAINER ID        IMAGE               COMMAND                  CREATED             STATUS              PORTS                  NAMES                   SIZE
553c6bf413f1        wordpress           "/entrypoint.sh apach"   39 hours ago        Up 15 hours         0.0.0.0:8080->80/tcp   wordpress_wordpress_1   71.75 MB (virtual 592.3 MB)
c828665d7494        mariadb             "/docker-entrypoint.s"   39 hours ago        Up 39 hours         3306/tcp               wordpress_db_1          2 B (virtual 387.5 MB)

As you can see I use two containers, one for the wordpress (apache, php, etc) and the other one for mariadb, and I think the SIZE column speaks by itself.

Lets see what means each of the columns so you can start getting familiar with the different components of Docker.

CONTAINER ID

This is the ID that Docker assigns to the container and that we can use as unique referer.

IMAGE

Base image use to create the container. We can consider an image as the template for a container, it contains all the basic elements already installed to work. Once the container is created we can modify it as we like, notice that the image itself is not modified, just the changes made on the container. In this cases the wordpress image container an installation of wordpress ready to use and includes an apache server, if I wanted to run a different wordpress I will simply use the same image to create a new container and start from scratch.

COMMAND

This is the command that is executed when the container starts, in this case a script that takes care of starting all the necessary services.

CREATED & STATUS

How long since the container was created and its uptime.

PORTS

By default Docker generates a virtual network, similar to the VBox’s host-only, with which we can access the container ports only from the Host or from other containers. In this case the wordpress’s container maps port 80 of the container to the port 8080 of the Host what means that if we connect to the port 8080 of the Host the port 80 of the container will reply but, in the mariadb’s container, the port 3306 is not mapped meaning that it will be only accessible from the Host or, in this case, from the wordpress container.

NAMES

In addition to the ID the containers also could be referred by a name, if it’s not specified when the container is created Docker will assign it a random one formed by two-word, some could be quite funny.

Another thing that made me fall in love with Docker is small deployment time, creating a new container takes only a few seconds, and only the first time may take a while if the base image is not already downloaded.

A Docker usage example could be a metasploit image and another one with OpenVAS that I created and that allows me to run those application without installing anything else than Docker in the Host as all the dependencies are already inside of the images. This way if I need metasploit I just create a container with that image and I will be able to use it immediately.

Another option that Docker has is the option to create a Swarm, something like a cluster, using different machines and administrate all from a single one. This way the containers will run in different machines be them the ones we specify, be them the ones Docker decides. The only inconvenience of the Swarm is that the ports are not mapped to the administrator machine but to the one where the container is running, meaning that if we run a container in a remote machine we will need to connect to the port on that machine. About Swarm I will talk in future post and will explain you how to build a simple one.

Hope you enjoyed this “little” introduction to Docker, if you want to read more you can go to their website:  https://www.docker.com

Posted in docker | Leave a comment

CTF Mugardos 2015 Writeup – Forensic

Statement:

This cursed image 100 points

I know I put it somewhere, but where..

File for the challenge: https://mega.nz/#!YcBw2A4K!jUqgKnf5YZhmjZtpNEH7jM3h2rQ4KyvrOiBaLYmdWys

Key format:
– SHA256 of the key
– No spaces
– Uppercases, lowercases, numbers and special characters exactly as they appear in the file of the challenge

Solution:

In this challenge we are asked to download a tar.gz file that contains the file image.raw.

File command returns the following information:

forensic1

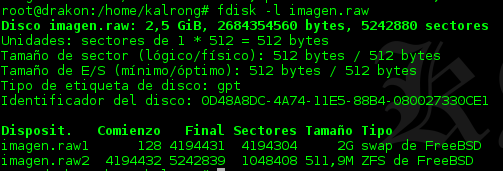
Looks like is a disk image, the next step would be to see what fdisk has to say:

forensic2

Looks like almost everything is swap and we have a 500Mb partition in ZFS format. The problem is that ZFS doesn’t allow file I/O so we can’t directly mount it, first, we need to use losetup to mount it so ZFS could recognize it.

For that we need to calculate the offset of that partition, knowing that block size is 512 bytes and that the partition starts at 4194432:

512 * 4194432 = 2147549184

Once we know the offset we execute losetup as follows:

forensic3

To proceed with the following steps we need to have installed and loaded the ZFS modules. In my case I had several version problems as the version used for the challenge was newer than the one in the repositories so I compiled the modules from the sources.

We use zpool to import the ZFS pool:

forensic4

Zpool warn us that the pool was used in another system previously so we need to force the import with the -f option and also use its name (Mugar2x3); and then we confirm that the pool was imported:

forensic5

With this the partition should be already mounted on our system’s root under the folder Mugar2x3. If this is not the case we can use the following command to mount it:

zfs mount Mugar2x3

We can see that it only contains several subfolders and a lot of files with the famous “Lorem ipsum”, but not a single picture that is what the challenge asks.

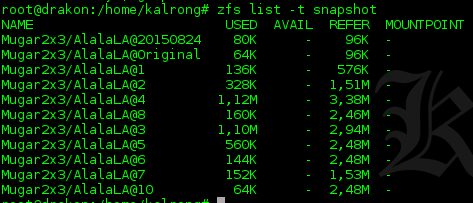
ZFS has the feature to generate snapshots to be able to recover old status of the file system, we take a look and we can see that there are several of them:


forensic6

The snapshots are sort from older to newer, in the case that we miss we need to destroy and import the pool again.

In this case, judging by the size, our best option was the snapshot 3, so we proceed to do a rollback to it:


forensic7

As we still have a lot of files in the middle I used the file command to locate the picture:

forensic8

We open the file and voila:

forensic9

We then calculate the SHA256 and we have solved the challenge.

Posted in ctf, writeups | Leave a comment

CTF Mugardos 2015 Writeup – Stego200

Statement:

AM 200 points

Now seriously, when it comes to listen to music, nothing better than the radio, or not?

Maybe we are too nostalgic.

Format of the answer:
– Uppercase and lowercase as they appear in the flag
– No spaces

Solution:

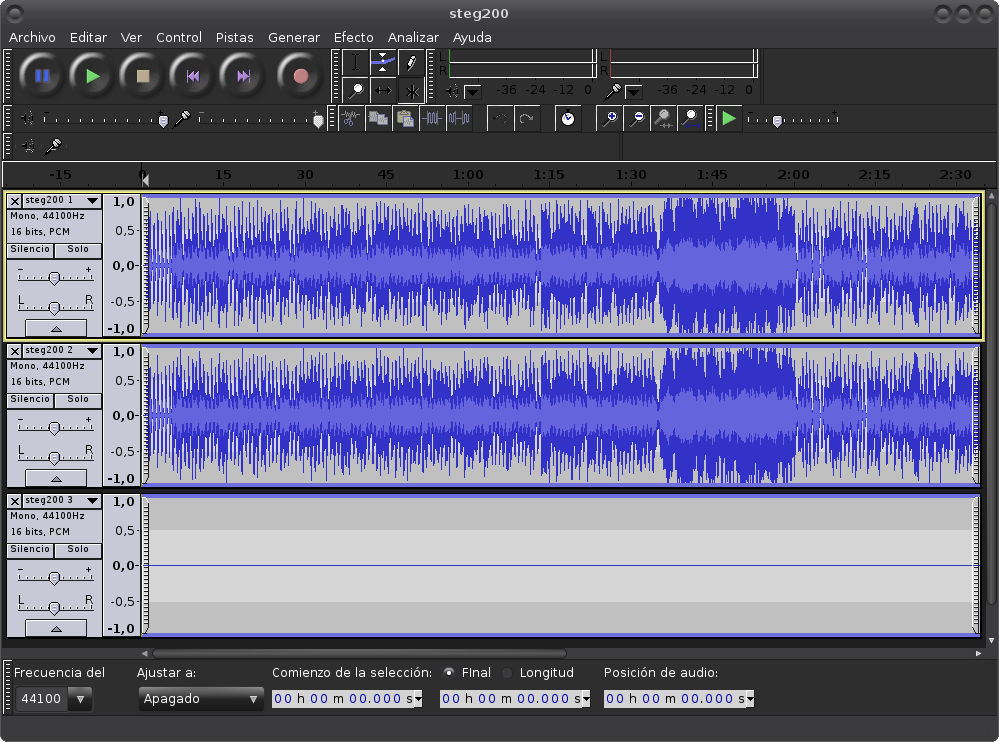
In this challenge they gave us an ogg file, nothing strange to the naked eye. Lets start openning it with Audacity:

estego1

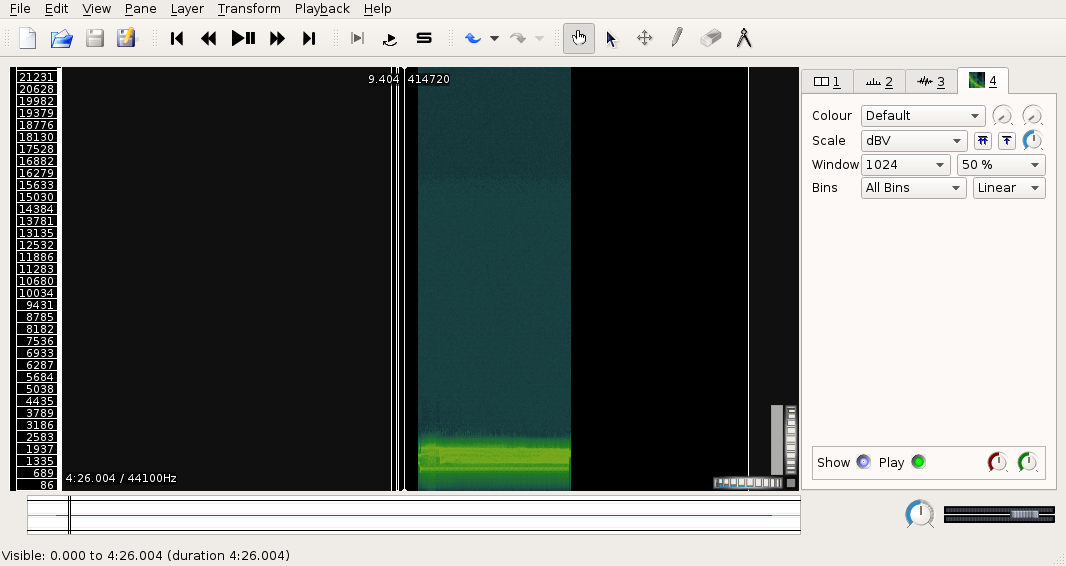
We can see that the first two tracks are the original song but there is a third track, lets extract it and open it with Sonic Visualiser, app that has helped me a lot in the past with the typical text hidden in audio thanks to its layers:

stego3

As Im used to I add the spectrogram layer just in case there was some text and because I like it more, in this case we didn’t find any text but we were able to locate some audio in an specific part.

After thinking about several ways and doing several tests with software oriented to weatherfax that we already saw in other challenges I decided to try my luck with SSTV. For that we will play the audio with paplay while we set QSSTVE to listen, notice that you need to redirect the audio output to the input so QSSTV can receibe it, in my case using pulseaudio I did this using pavucontrol, in the input sections and the monitor mode interfaces.

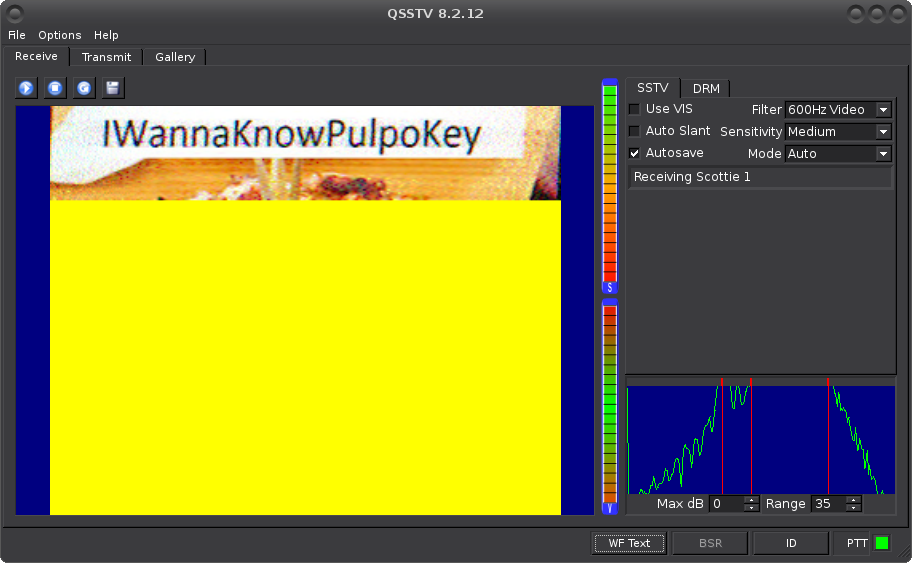
Here we can see that QSSTV has recognized the signal as SSTV in Scottie 1 mode and begins to show the result:

stego4

When the audio finish to play we get the following image:

stego5

Calculate the SHA256 of the string “IWannaKnowPulpoKey” and we get the flag we need.

Posted in ctf, writeups | Leave a comment

CTF Mugardos 2015 Writeup – Crypto100

And lets reopen the blog with the first writeup of the CTF that took place in 2015 at the Kernel in Mugardos.

Statement:

When does the trope open? 100 points

When does the trope open? I wanna dance!

Format of the answer:
– SHA256 of the flag
– Lowercase
– No spaces

Solution:

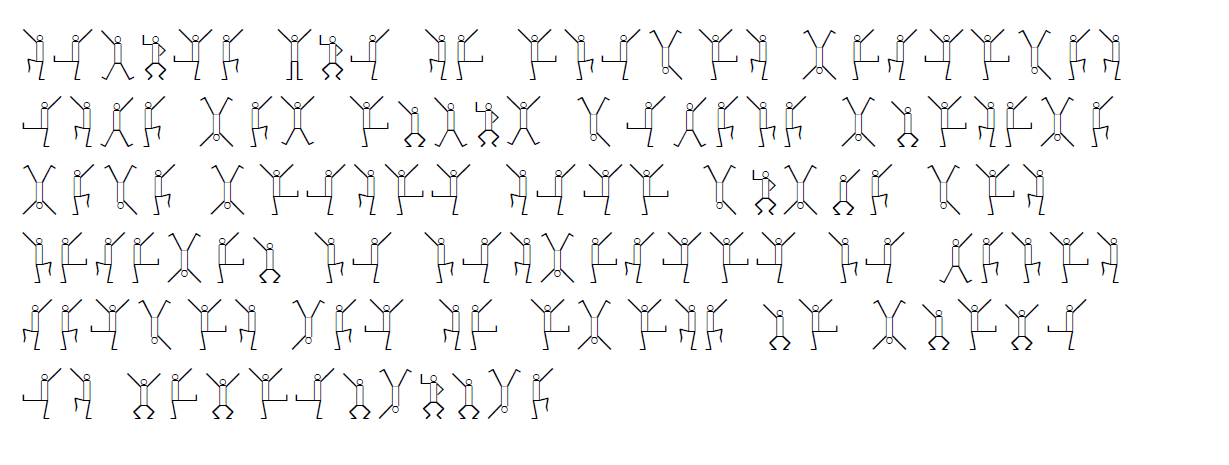
In this challenge they provided the following image:

crypto100

My first impression was, ¿What the …? Thinking that maybe the organization didn’t copy/paste each stickmen I did several searches in google for fonts done with them. Found several ones but  an specific one matched exactly and on its detailed information said that it was based on a message shown in one of Sherlock Holmes novels.

Font: http://www.fontspace.com/martin-bergman/dancingmen

As the website already shown the alphabet with all the stickmens that we needed I directly translated each stickmen to its corresponding letter obtaining the following message:

jvxlif hlv jz ruvdrj tzwirdfj vjkf tfe rcxle dvkfuf tcrjztf tfdf trvjri jvir dltyf drj wfidrj gfi jz rtrjf cr tcrmv vj mzmrvcglcgf

A quick Caesar bruteforce showed that it was a Caesar with key 17. We got the following message:

seguro que si ademas ciframos esto con algun metodo clasico como caesar sera mucho mas formas por si acaso laclave es vivaelpulpo

In English it will be: “if we also cypher this with a classic method like Caesar it will be mucho more forms just in case the password is longliveoctopus”

Doing the SHA256 of the string “vivaelpulpo” it will show the flag we need.

Posted in ctf, writeups | Leave a comment

Hello World, again!

Finally back, in the end I decided to open the blog agan and I hope to add more content little by little, in the next few days I will probably add several things that are pending like some writeups that I did for the Kernel 2015’s CTF.

Hope you enjoy the new content (as the blog is quite ugly hehe)

Posted in Sin categoría | Leave a comment